


BASIC SEEDSAVING FOR BEGINNERS

Seedsaving is easy; people have done it for thousands of years, in the process breeding all of the wonderful vegetables that we eat today. Only in the last century has it been taken over by professionals.
With a little care you and all your neighbours can grow good seed; ideal for your own conditions, with better germination, and growing strong, healthy plants. You'll get better seed than you can buy, even from us. And you can keep your own varieties going for future years. But .. . just as with growing a new veg, there are a few key bits of information you need to know to make it work. It's not hard, you just need to know how to do it.
basics
One key thing before you start - you can't save seed from F1 (hybrid) varieties. You need real, open-pollinated seed, like ours. We don't sell any hybrid seed at all, for this very reason.
Later, do remember to dry your seed properly, or it will not survive storage. Don't use heat though to dry it - we have a whole info sheet on drying your seed, so read that when you've got it harvested.
For now all you need to do is start with non-hybrid seed, & read on to find out how many plants you need to grow, and what to bear in mind to get good seed that is true to type. .
OUR Seedsaving Instructions
This is released under a Creative Commons licence, so you can copy and distribute it as much as you like - for example at seed-swaps - providing you do not charge for it, or modify it, and that you give us credit for writing it:
- Download the Free Seed Saving Instruction Booklet , as a PDF for printing out . (The full text is also on this page, below)
- There's also a Large Print Version but that uses a lot more paper to print.
- If you're running a Seed Swap or want to give away many copies, there's also a more basic version that fits onto 1 sheet of paper double sided, so it is cheap to copy.
- You can buy an excellent book from the Books Page which is more detailed and has nice pictures. We sell this at a discount.
These sheets are a very basic introduction to seedsaving for home use, & will help you to grow good quality pure seed that will grow true to type. If you are planning on growing seed for wider distribution or exchange, for example for a local seed bank, you will want more detailed instructions. Sue Stickland's book Back Garden Seed Saving is an excellent reference, or there is a good set of films you can watch online for free at DIYseeds.
The Secret of Saving Great Seed
(TEXT FROM THE DOWNLOADABLE booklet)
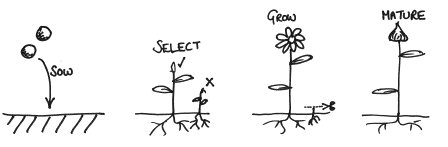
You want healthy seed that is true-to-type and keeps well. For any one vegetable, you need to ask yourself these questions:
CROSSING
- Will these plants cross with any others?
- Is this a good thing, or a bad thing? (Usually bad)
- How does this happen? (Wind? Insects?)
- What can I do to control this? Do I need to do anything?
POPULATION
- Do I need a minimum number to get healthy seed? (e.g. do they breed as group?)
- Or do the plants live on their own and self-pollinate? (so I can save seed from just a few?)
- Have I chosen the best plants for seed?
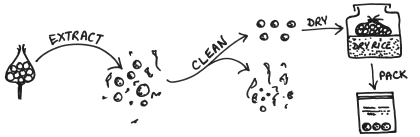
SEED EXTRACTION AND DRYING
- Do I need to do anything special to the seed ?
- Is my seed well dried and well labelled?
The answers are different for each vegetable. So look in the appropriate section below, and you'll know what to do. Its all pretty easy but you do need to look it up in each case.
If these sheets encourage you to develop your seedsaving further, try & get hold of one of the books listed at the end, which will cover all of the species not listed here & give you fuller instructions for everything.
Happy seedsaving! Kate & Ben (www.realseeds.co.uk)
All you have to do:
Broad beans
Broad beans will cross with other varieties that are growing nearby. So if you want to keep your variety pure, you need to isolate them in some way. Theoretically you should aim for at least half a mile between varieties. In practice, in a built up area, fences, trees and houses will all reduce insect flight. This means you should have minimal crossing even with beans much closer than half a mile so long as none of your immediate neighbours are growing different varieties of bean.
In an open situation like an allotment, you can physically isolate plants. Broad bean pollen is transferred by insects working the flowers, but the plants will also self pollinate, so if you can exclude insects at flowering time, say by a covering of fleece, your seed crop will be pure.
The simplest method of all, if you are growing a relatively large number of beans and you are not concerned about achieving 100% purity (eg just for your own use), is to mark and save seed from several plants in the middle of a block of beans. Insects are relatively unlikely to come from a neighbouring patch straight to the middle of your patch, tending to work the outside flowers first. So by the time they reach your seed beans, the amount of 'foreign' pollen remaining should be small. Always keep seed of strong, healthy plants and get rid of any that are not typical of the variety ideally before they flower.
Let your seed beans mature and dry on the bush. The pods will turn dark drown, dry & wrinkled. Then pick and shell them out. Check that they are really dry by biting on them. If your teeth leave a dent, dry them further in a warm (not hot) place with a good flow of air. Broad bean seeds should keep for several years, so there is no need to grow plants for seed every year.
French and runner beans
It is important to grow some bean plants specifically for seed, rather than simply collecting the left-over pods at the end of the season. The plants should be good strong specimens, and any that are less healthy looking or not true to type for the variety should not be used for seed production.
French beans are self-pollinating, mostly before the flowers open. Despite this, they can be crossed by insects with other varieties nearby. The extent of crossing varies by area. If you are just saving seed for your own use, grow your seed crop of french beans at least 6 feet away from any other variety (12 feet if possible), and you are unlikely to have a significant problem with crossing in the UK.
Runner bean flowers need to be 'tripped' by wind or insects before the beans set, and are much more likely to cross with other varieties grown nearby than french beans. Ideally, to be sure that no crossing takes place, seed crops of runner bean should be at least 1/2 a mile away from any other varieties of runner bean. Bear in mind, though, that buildings, trees, and other barriers will limit insect flight patterns, and if you are gardening in a town or built up area, you are likely to have relatively little problems with crossing unless your immediate neighbours are also growing runner beans. If they are - or on an open site such as an allotment - your only answer may be to try to persuade your neighbours to grow the same type of runner.
To collect the seeds, allow the pods to mature fully on the plant until they start to yellow and dry out. In wet weather, collect the pods individually as they get to this stage. Then spread out somewhere out of the rain with a good airflow until the pods are fully dry and brittle. Once they are dry, shell out the beans and dry further out of the pods. The beans should be dry enough that they break when you bite on them, rather than leaving a dent. Store in an airtight container. If they are well dried, and stored in a cool dark place, the beans will last around 3 years.
If you have problems with weevils eating your seeds, put the sealed container in the freezer for a week immediately after drying the beans; this will kill any insect eggs before they hatch. When you take them out, let the container come up to room temperature before opening it, otherwise the beans will absorb moisture from the air.
Peas
Peas are almost entirely self pollinating, only very occasionally crossing with other plants. Set aside a section of row that is entirely for seed production, and make sure you sow at a time that will avoid pea moth To avoid physical mixing up of the seeds, separate different varieties of pea with another crop. Check the row from time to time as the peas grow, and pull up any plants that are weak or not true to type.
Let the peas mature until the pods are brown and the seeds start to rattle. If the weather is very bad, pull up the whole plants and bring inside (for example hung upside down from the shed roof) once the pods start to wither, to ripen and dry further. Once the pods are really dry, shell the peas out. Dry the shelled peas further in a warm (but not hot) place, label with the variety and date, and store.
Aubergines
Aubergine flowers are mainly self pollinated, but can be crossed by insects. So if you are planning to save seed, you should only grow one variety. Aim for 6 to 8 plants each year to maintain a variety long term. For 100% isolation you need 50 feet between your seed plants and any other aubergines. If you are growing just one variety in a greenhouse/polytunnel you should be able to get away with a somewhat smaller distance.
To get ripe seeds let the fruits mature well past eating stage. Purple/black cvs turn a muddy purple-brown colour, green/white cvs turn yellowish. Mark 1 or 2 early good fruits on each plant to leave for seed, and then pick and eat later fruits.
To remove the seed, cut into quarters lengthwise, avoiding the core, and pull apart. The hard brown seeds should be obvious. Put the quarters into a bowl of tepid water, and rub the seeds out with your fingers. You may need to pull them apart to get all of the seeds. Add more water, stir thoroughly, & wait a few minutes. Good seeds will sink to the bottom, leaving debris and poor quality seeds on the surface. Pour the debris off gently through a sieve, then refill with water and repeat a couple more times.
Eventually you will be left with good seeds in plain water. Empty into a clean sieve, shake to remove as much water as possible, and then tip on to a plate and spread out well. Put to dry somewhere warm but not hot, and mix occasionally to make sure that they dry evenly and don't stick together. Aubergine seeds will keep up to 7 years if dried thoroughly & stored in a cool dark place.
Sweet peppers and chillies
Sweet peppers and chillies are both members of the same species, Capsicum annuum (some less common chillies come from other capsicum species).
Pepper flowers are self pollinating, and will set fruit without any insect activity. However, they will also cross readily, and sweet peppers will happily cross with chillies. You need to isolate your plants by around 150 feet (50 metres) from any other peppers or chillies growing nearby. Even if you are only growing one variety be careful about other varieties growing in adjacent gardens or allotments.
If you want to grow several varieties, or if your near neighbours are also growing peppers, you could consider making an isolation cage to cover 3 or 4 plants. This is easy to do, and costs very little, especially if you can get hold of some old net curtain material. You can put a cage up over plants grown in pots, growbags or directly in the ground.
To save the seed, take peppers on your isolated plants which have ripened fully to their final colour (usually yellow or red). Cut the peppers open carefully, and rub the seeds gently off of the 'core' onto a plate. Wear rubber gloves to deseed chillies, as the chilli oil sticks to your fingers and is very hard to wash off. Dry the seeds in a warm but not hot place until they snap rather than bending
Making an isolation cage
To make a simple isolation cage ideal for peppers or aubergines, you need some cheap nylon flyscreen 5 times as long as it is wide, four canes or thin stakes, and some string and garden wire. Alternatively, you can use old net curtains, or other netting small enough to exclude insects. A piece of screen 1m by 5m will give a cage large enough to cover 3 or 4 plants.
Cut a square piece of screen 1m x 1m to make the top of the cage, and then fold the remaining strip of flyscreen round and sew its ends together. The resulting band will be the sides of the cage. Then sew the top to the sides, making a cube of flyscreen with the bottom missing.
To put up the cage over your plants, hammer the four canes into the ground in a square a little smaller than the cage top, so that they stick up a little less than the height of the cage. Twist a short piece of wire tightly round the top of each cane, and then run string in a square around the tops of the canes, supported by the wires to stop it slipping. Run a second piece of string around the stakes lower down to stop the sides of the cage blowing in against the plants. Then slip the cage over your plants, and weigh it down with earth or rocks.
Tomatoes
Most modern varieties of tomato are self pollinating, and will not cross. The anthers on tomato flowers (which make the pollen) are fused together to make a tight cone that insects cannot enter. Usually the stigma (the receptive surface for receiving pollen) is very short, and so is located deep inside this cone of anthers. No insects can get to it and the only pollen that can fertilise it comes from the surrounding cone of anthers.
In a few varieties however, the stigma is much longer, sticking out beyond the cone of anthers. In this case, insects can get to it, and there is the chance of cross-pollination. Varieties with longer stigmas include potato leaved tomatoes and currant tomatoes. To avoid crossing only grow one variety with exposed stigmas. The double flowers which are sometimes formed first by many beefsteak tomatoes also often have exposed stigmas, but later single flowers will be normal.
To collect the seed, allow your tomatoes to ripen fully. Then collect a few of each variety that you want to save seed from. Slice them in half across the middle of the fruit, and squeeze the seeds and juice into a jar. You then need to ferment this mixture for a few days - this removes the jelly-like coating on each seed, and also kills off many diseases that can be carried on the seeds. To do this put the jar of seeds and juice in a reasonably warm place for 3 days, stirring the mixture twice a day. It should develop a coating of mould, and start to smell really nasty!
After 3 days, add plenty of water to the jar, and stir well. The good seeds should sink to the bottom of the jar. Gently pour off the top layer of mould and any seeds that float. Then empty the good seeds into a sieve and wash them thoroughly under running water. Shake off as much water as possible, and tip the sieve out onto a china or glass plate (the seeds tend to stick to anything else). Dry somewhere warm but not too hot, and out of direct sunlight. Once they are completely dry, rub them off the plate and store in a cool dry place, where they should keep well for at least 4 years.
Beetroot, chard & leaf beet
Beetroot, leaf beet/perpetual spinach, swiss chard & sugar beet are all members of the same family & will cross readily. They are biennial, and flower in their second year. Chard/leaf beet for seed are overwintered in situ, and will be fine in most of the UK. For home use select a minimum of six to eight plants to leave for seed which best fit your needs (depending on your preference for stem versus leaf, smooth or wrinkled leaves etc). Beetroot can also be overwintered in situ, or can be harvested in autumn, the best plants selected & stored then replanted in spring.
All types of beet will cross with one another, and since the flowers are wind pollinated, crossing can take place with any other flowering beet plants within around 2 miles. How fussy you need to be about crossing depends on what you are trying to achieve. If you simply want a reasonably diverse population of leaf beet, a degree of crossing is not that important. Plant your seed plants closely together in a square, and take seed from the central plants in the block; you will find that the amount of 'contamination' is minimal providing there aren't large numbers of other flowering beets right next door.
If you are aiming to keep a variety true to type you need to isolate it, usually by physically covering your seed plants. To do this, plant at least six plants very close together in a circle, with a wooden stake in the middle. As the seed stalks form, growing up to four feet tall, tie them together, supported by the stake. Then as they develop cover the group of flower heads with either a shiny paper bag that will withstand rain, or a bag made out of agricultural fleece. Shake the bag from time to time to make sure that pollen is distributed within the bag.
As the large, prickly seeds mature, keep an eye on them, and start to harvest as they turn brown and start to dry out. You can either cut entire seedstalks, or harvest mature seeds by rubbing them into a bucket. Make sure that the seeds are thoroughly dry before storage, and they should last at least five years.
Carrots
Carrots are biennial, flowering in their second year of growth. In areas with mild winters, leave your carrots in the ground, mulching them heavily. The foliage will die back in autumn, but will then resprout and start to flower in the spring. In colder areas, dig up your carrots in the autumn, and select the best coloured and shaped roots. Twist off the foliage, and store the roots in a box of dry sand in a frost free place, making sure that they don't touch. In spring, replant the roots, and they will resprout and flower.
If you want to maintain a carrot variety effectively, you really need to save seed from at least 40 good roots to maintain good genetic diversity. If you have too small a genetic pool, you will end up with small, poor quality roots in a very few generations.
Carrots grow into big plants waist high or taller, producing successive branches with large flat umbels of flowers. They are insect pollinated, and need to be isolated from other flowering carrot varieties by at least 500m in an open field situation. This is not normally a big problem, since few people let their carrots go to seed. However, they will cross with wild carrot (Queen Anne's Lace), giving thin white useless roots. As with all insect pollinated crops, barriers such as houses, tall hedges and other high crops can affect insect flight paths drastically, so you don't necessarily need to eliminate all Queen Anne's Lace within a 1/2 km radius; but do watch out for any white roots in subsequent generations and get rid of them.
To harvest your carrot seed, keep an eye on the umbels of flowers, and cut them off with secateurs as they start to turn brown and dry. If you have plenty of plants, just save seed from the first and second umbels of flowers to appear on each plant, as these will give the biggest and best seed. Dry the seed heads further inside, and then rub them between your hands or in a sieve to separate them. You will notice that the seeds have a 'beard' which is removed in commercial seed to make them easier to pack.
You can sieve the seeds further to remove more of the chaff, but there is no need to get the seed completely clean - just sow slightly more thickly to allow for the chaff mixed in. Carrot seed is relatively short lived, but if it is stored somewhere cool and dry, it should give good germination for 3 years.
Some common herbs
Basil, coriander and dill are annuals, parsley is a biennial, flowering in its second year of growth.
Basil flowers are insect pollinated, and different varieties flowering within around 150' of one another may cross. On a garden scale, if you want to grow several types of basil, just keep picking the flower stalks off of all the varieties apart from the one that you want to grow for seed. Once several flower spikes have set and the flowers have started to wither, mark those spikes for saving seed from, and you can then allow the other varieties to flower. The seeds are ready to collect when the spikes turn brown and dry out. Don't worry about the seeds dropping out - they are well attached, and actually need quite a lot of rubbing to free from the dead flower heads.
With both coriander & dill, to get the best seed for sowing in future years, pull up and discard the earliest plants to bolt, and only save seed from those plants that produce plenty of leaf and flower late. It is best to plan to save seed from early summer sowings, to allow plenty of time for the seed to mature and dry on the plant. Harvest as soon as the seed is brown and dry, as it does tend to drop from the seed heads. Rub the heads together in your hands over a bucket to free the seed. Dill seed usually comes cleanly away from the seed heads. Coriander seed tends to contain more chaff, but you can winnow it by pouring gently from one bucket to another in a light breeze if you want to clean it for kitchen use.
To save parsley seed, overwinter at least two or three plants. In warmer areas mulch heavily with straw or cover plants with a frame, elsewhere grow a few plants in a polytunnel or greenhouse. The next spring, the plants will start to flower and produce seed. Flat and curly leaved varieties will cross, as the flowers are insect pollinated, so you should only grow one type for seed at a time. Harvest the seeds from individual flowerheads as they dry and turn brown, as they tend to drop from the plant when ready.
Broccoli, kale and cabbages
Sprouting broccoli, cabbages, cauliflowers, calabrese, kales and brussels sprouts are all members of the same family (Brassica oleraceae), and will all cross with each other. They won't cross with turnips, swedes, oriental brassicas or mustard greens. In addition, they are mainly self-incompatible - which means that in order to get seed, insects have to carry pollen from one plant to another to pollinate the flowers. Because of this, you can't simply grow your broccoli or cabbages for seed in an insect proof cage to avoid crossing.
So long as you only seedsave from one member of the family in any given year, you can grow as many other brassicas as you like without problems so long as you don't let them flower.
For absolute seed purity, make sure that there are no other flowering brassicas within a mile of your garden. In practice, fences, trees and tall crops all break up insect flight patterns, so as long as you don't have any immediate neighbours with flowering crops in their garden, you shouldn't have too many problems with crossing. To make it as easy as possible for insects to work your seed plants, make sure that they are laid out in a block, rather than a row, so that bees tend to move from one plant to another, rather than away to other flowers elsewhere.
Keep at least twelve plants for seed, ideally more. Remove any poor specimens, or any that are not typical for the variety -you can always eat these plants, so long as you don't allow any flowers to open.
All of the brassicas, including cabbages, will throw up a tall flower stalk covered in lots of small yellow flowers. These will then form slender seed pods, which start out green, and turn a straw colour as they mature and dry. Once they start to dry, keep a close eye on them, as they tend to shatter and drop their seed. Its best to cut entire plants once most of the pods begin to look dry, and then leave them to mature further on a sheet indoors. Once they are thoroughly dry, the seeds will come out of the pods very easily; the simplest way is to trample the plants on top of a large sheet, and then sieve out the debris.
You should get lots of seed from even a few plants. The seed will keep well for up to five years so long as it is stored somewhere cool and dry.
Note: We also have a whole page devoted to processing brassica seed.
Turnips and the oriental brassicas
Mizuna, pak choi, tatsoi and mibuna are all sub varieties of Brassica rapa - the same family as turnip. This means that although they will cross with each other, or with turnips in flower, they won't cross with broccoli or cauliflowers. Although you can only grow one of these vegetables for seed in any year, you can of course grow any of the others for kitchen use, so long as you don't allow them to flower at the same time as your seed plants.
To grow an oriental brassica or turnip variety for seed, you usually need to overwinter the plants. They are naturally biennials, producing their flowers and seeds in their second year of growth. Although spring sown crops may bolt to seed in hot summer weather, this is not ideal for seedsaving, as you may end up accidentally selecting for early bolting in future years. The best solution is to sow your seed crop after midsummer in a polytunnel, where semi-mature plants will overwinter quite happily in all but the coldest parts of Britain. If necessary you can give extra protection in cold weather by putting fleece over plants inside the tunnel. Select at least 12 of the healthiest and most typical plants to reserve for seed, eating the rest over the winter. In spring, the plants will flower, and then form seedpods. Make sure that there is good insect access to the tunnel at this point so that the flowers are pollinated.
The seedpods are green at first, but then gradually dry out and turn a pale tan colour. Once most of the pods are dry and brittle, cut the entire stalks of the plant, and lay out on a sheet somewhere undercover with a good airflow to finish drying off. Then rub and crush the pods with your hands to release the seeds, and separate the seeds from the chaff with a coarse sieve.
Note: We also have a whole page devoted to the details of processing brassica seed.Lettuce
Lettuce flowers are self pollinating, and very rarely cross. If you plan to save seed from more than one variety of lettuce, separate them by around 12 foot or plant a tall crop in between the rows.
Select two or three good lettuces from your row, and mark them for seed. It is very important not to save seed from any plants that bolt early, as you want to select for lettuces that stand well. Heading lettuces may need a little help for the flowering stalk to emerge; slitting the heads partially open with a knife works well.
Once the lettuces have flowered, the seeds will ripen gradually, starting in about a fortnight. Harvest seed daily to get the maximum yield, shaking into a bag. Or wait until a reasonable number of seeds are ready and then cut the whole plant. Put it head first into a bucket, shaking and rubbing to remove the seeds. If you leave the whole cut plant upside down in the bucket somewhere dry, slightly immature seeds will continue to ripen over the next few days.
Most of what you have collected in the bucket will be white 'feathers' and chaff. To sort the seed, shake it gently in a kitchen sieve. Some seeds will fall through the sieve, with the rest collecting in the bottom. The feathers and chaff will rise to the top, and you can pick them off. There's no need to get the seed completely clean; a little chaff stored and planted along with the seeds won't cause any harm.
If the seed feels a little damp, dry it further on a plate before labelling and storing. Lettuce seed should keep for around 3 years, provided it is kept cool and dry.
Pumpkins, courgettes, marrows and squashes
Beware that pumpkins, squashes, marrows & courgettes will all cross readily with each other. The best (usually only) way to save pure seed on a home scale is to hand pollinate one or more fruits. This is very easy & will avoid disappointments with lumpen squash/courgette crosses. The explanation given here is for pumpkins, but applies equally to squashes, courgettes & marrows.
Pumpkin plants have two different types of flower, male and female. The female flowers are the ones that will grow into pumpkins. They can be identified by the small immature fruit which should be obvious beneath the flower. Male flowers just have a straight stem. You need to transfer pollen from a male flower into a female flower, making sure that no pollen gets introduced from plants of a different variety.
One evening, when the plants are just beginning to produce flowers, find some male and female flowers that are going to open the next day. Buds that are just ready to open are much fatter than the others, and they have turned from green to yellow.
You need to stop these flowers opening, so that insects can't get into them. The easiest way to do this is to gently slip a thin rubber band over the end of the petals, to hold them shut.
The next morning go back to the plants. Pick a male flower, take off its rubber band, and tear off the petals. Gently take the rubber band off of one of your female flowers. Using the male flower like a brush, rub the pollen on to each section of the stigma in the centre of the female flower.
Then carefully rubber band the female flower shut again so that no insects can get in with more, 'foreign', pollen. Tie a piece of wool loosely around the stem of the female flower, so that at harvest time, you know which pumpkins you have hand pollinated.
Now leave the pumpkins to develop and ripen. After you have harvested them, keep them in a cool dry place for another month or so to ripen further indoors.
Then cut the pumpkin in half, and scoop out the seeds, leaving the rest of the fruit for cooking as normal. Wash the seed in a colander, rubbing it between your hands to get rid of the fibres, and then shake off as much water as possible.
Spread the seed out on a plate to dry. It needs to dry as quickly as possible, but without getting too hot, for example on a sunny windowsill. To test whether the seeds are dry enough, try bending one in half. If it is dry, it will snap rather than bending.
ONIONS & LEEKS
Onion and Leek seed is fairly easy to save your own. The process is the same for these plants but they are different species - so onions will only cross with other onions, and leeks will only cross with other leeks. They are all insect pollinated and so will cross with other varieties flowering nearby. Note that spring and even bunching onions will cross with all normal onions, so only allow one type to flower.
Allow at least 25 plants to overwinter and flower, harvest the seedheads once they become papery and dry - they are ready when you can see the black seed showing in half the flower buds in each head. Knock out the seed and let it dry in a tray. You will find it hard to get rid of all the papery bits round the seeds unless its really dry but it doesn’t really affect the seed.
Melons & cucumbers
All varieties of melon will cross. Ideally, you need around a quarter of a mile between different varieties. If your melons are in a greenhouse or tunnel, you can probably get away with a somewhat smaller distance, particularly if there are hedges, houses or other tall barriers in between your melons and the neighbouring crop. Cucumbers won't cross with melons, but will cross with any other cucumbers or gherkins nearby. Again, you need around a quarter mile isolation to make sure that your plants won't cross.
It is possible, although fiddly, to hand pollinate both melons and cucumber flowers. Grow plants under a fleece tunnel to exclude insects, and then hand pollinate the flowers on those plants with a paintbrush. Make sure that you exchange pollen between different plants to keep the diversity of your variety.
To harvest melon seed, pick the melons when they are ripe and ready for eating and keep indoors for a further day or two for the seed to mature further. Then open the fruit, scoop the seed out, and wash in a sieve under running water. Spread out on a china plate to dry thoroughly.
Cucumbers need to be ripened well beyond the edible stage. They will become much fatter, and green varieties will turn a dark yellow brownish colour, white varieties a paler yellow. Keep for a week or so after picking to let the seeds mature fully. Then cut open, scoop out the seeds and surrounding pulp into a jamjar, add a little water and stir well. Leave the jar on a sunny windowsill for 2-3 days for the seeds to ferment. On the third day, fill the jar fully with water, and stir well again. The good seeds should sink to the bottom of the jar, leaving pulp, debris and empty seeds floating on top. Gently pour off the water and debris, refill the jar, and repeat. After a couple of rinses, you should be left with good seeds at the bottom of a jar in clean water. Drain off the water, and spread out on a plate to dry well.
Both melon and cucumber seeds will last for several years if dried well and stored somewhere cool.
Some useful references
"Back Garden Seedsaving" by Sue Stickland (ISBN 1899233091) is an excellent reference with a good intro to seedsaving plus details about each individual crop.
"Seed to Seed" by Suzanne Ashworth.(ISBN 1882424581) tells you simply and clearly what you need to do to save seed of any veg you care to mention using materials you have at home.
"The Seed Savers Handbook" Jeremy Cherfas, (Grover Books, 1996) is also good and also talks in more detail about the reasons that you might want to save your own seeds.
"Breed your own Vegetable Varieties" by Carol Deppe ( Chelsea Green Pub Co; ISBN: 1890132721) is a good introduction to vegetable breeding for the interested amateur. Until 50 years ago, all gardeners were plant breeders - it's not difficult, you just need to know how to do it, and the tradition has been lost. This book will give you the basics, and then if you're interested, the nitty-gritty too.